What is UDP ?
User Datagram Protocol (UDP) is part of the Internet Protocol suite used by programs running on different computers on a network. UDP is used to send short messages called datagrams but overall, it is an unreliable, connectionless protocol. Basically a client will throw something to the server. And then, the server may or may not take the file, do something to that file and then may or may not send the file to some client. Unlike TCP connection, UDP doesn't need to establish connection between server and client before handling any kind of transfer.
What we will do :

First, we create a public class named UDPClient under UDPClient project. The port number is where (Server) we will send our data. Scanner will be used to take user input for the filename.
A DatagramSocket is the sending or receiving point for a packet delivery service. Each packet sent or received on a DatagramSocket is individually addressed and routed. Multiple packets sent from one machine to another may be routed differently, and may arrive in any order. We created a DatagramSocket named ds.
DatagramPacket is used to implement a connectionless packet delivery service. We created two DatagramPacket named outdata (for sending packet to server), indata(for receiving packet from server).
byte array is required to get the data from the packet as bytes. So we also created them.
Java InetAddress class represents an IP address. The java.net.InetAddress class provides methods to get the IP of any host name. We will get localhost for this purpose.

Now we know that server doesn't know anything about client unlike TCPconnection where firstly connection in established between server and client. So to get our server know about the client, we will send something to server from our client program. I sent address and port number ( it's not necessary, but i did it anyways :P ).
outdata is the DatagramPacket and it takes 4 parameters as input. Serially they are:
#Byte array where the data is stored
#Length of the byte array
#Address of the client
#Port number of the client

Now server knows client's port and address. So from the server (we will discuss it later), some specific file names from specific directory is sent to the client as packet and client will now receive that packet in indata, the DatagramPacket we declared earlier. For receiving a packet only byte array name and length is required, in which we will store our packet. Then converting into string, we simply print out the file names in the screen for the client to choose which file should be downloaded.

String fname will contain the user input file name and we will send it to the server via packet like we did at the first time.

Now after the server get the file name for download, server will send that as a packet and client will receive the file and write it in client's desired path.
public class BufferedWriter extends Writer. Writes text to a character-output stream, buffering characters so as to provide for the efficient writing of single characters, arrays, and strings. We used BufferedWriter to write out the file.
In java, FileOutputStream is a bytes stream class that's used to handle raw binary data. To write the data to file, you have to convert the data into bytes and save it to file.
An OutputStreamWriter is a bridge from character streams to byte streams: Characters written to it are encoded into bytes using a specified charset . ... Each invocation of a write() method causes the encoding converter to be invoked on the given character(s).
Finally we will close the socket.
See the sample code below for UDPClient. Next we will talk about the server part.
Server Part:

Same as client code before, we declared DatagramSocket, Server needs the address and the port number of the client that is trying to connect with it. So we will get the address and port from the client's file using getAddress() and getPort() method.

Now we have just received the packet here and printed the result. With this server got the address and port number of the client ( So, later server can send packet to the address of the client willingly ).

Now, server will send the file names from the directory. String dirname contains the path of the directory. Then we created a File named f1 to get the files from dirname and then created an array direct[] to contain the list of all the files from f1. Then with some coding we got our file names and send it to the client as packet.

Now, server will get the file name for downloading from the client. String fname holds the file name to be downloaded. Then we check whether the file exists in the direct[] or not. If we find matching, then we preserve the index of the file. Then, File copy = new File(direct[idx].getAbsolutePath()); it will contain the path of the desired file. Then with the help of BufferedReader, we will write the file in String s, and then convert it to bytes for packeting, then we will send it to the client. Finally client will then rewrite the file in it's desired directory which we have already seen above.
Here is the code for UDPServer. Thank you for reading patiently.
Now, let's see how to transfer any size of file here.
User Datagram Protocol (UDP) is part of the Internet Protocol suite used by programs running on different computers on a network. UDP is used to send short messages called datagrams but overall, it is an unreliable, connectionless protocol. Basically a client will throw something to the server. And then, the server may or may not take the file, do something to that file and then may or may not send the file to some client. Unlike TCP connection, UDP doesn't need to establish connection between server and client before handling any kind of transfer.
What we will do :
- Create two new project: one for Server, another for Client
- Server will show client specific file items in a specific directory
- Client will then request the server to download a file from that directory by inserting the file name
- Server will then find the file in the directory, make a copy of it in another desirable directory
- Close socket

First, we create a public class named UDPClient under UDPClient project. The port number is where (Server) we will send our data. Scanner will be used to take user input for the filename.
A DatagramSocket is the sending or receiving point for a packet delivery service. Each packet sent or received on a DatagramSocket is individually addressed and routed. Multiple packets sent from one machine to another may be routed differently, and may arrive in any order. We created a DatagramSocket named ds.
DatagramPacket is used to implement a connectionless packet delivery service. We created two DatagramPacket named outdata (for sending packet to server), indata(for receiving packet from server).
byte array is required to get the data from the packet as bytes. So we also created them.
Java InetAddress class represents an IP address. The java.net.InetAddress class provides methods to get the IP of any host name. We will get localhost for this purpose.

Now we know that server doesn't know anything about client unlike TCPconnection where firstly connection in established between server and client. So to get our server know about the client, we will send something to server from our client program. I sent address and port number ( it's not necessary, but i did it anyways :P ).
outdata is the DatagramPacket and it takes 4 parameters as input. Serially they are:
#Byte array where the data is stored
#Length of the byte array
#Address of the client
#Port number of the client

Now server knows client's port and address. So from the server (we will discuss it later), some specific file names from specific directory is sent to the client as packet and client will now receive that packet in indata, the DatagramPacket we declared earlier. For receiving a packet only byte array name and length is required, in which we will store our packet. Then converting into string, we simply print out the file names in the screen for the client to choose which file should be downloaded.


Now after the server get the file name for download, server will send that as a packet and client will receive the file and write it in client's desired path.
public class BufferedWriter extends Writer. Writes text to a character-output stream, buffering characters so as to provide for the efficient writing of single characters, arrays, and strings. We used BufferedWriter to write out the file.
In java, FileOutputStream is a bytes stream class that's used to handle raw binary data. To write the data to file, you have to convert the data into bytes and save it to file.
An OutputStreamWriter is a bridge from character streams to byte streams: Characters written to it are encoded into bytes using a specified charset . ... Each invocation of a write() method causes the encoding converter to be invoked on the given character(s).
Finally we will close the socket.
See the sample code below for UDPClient. Next we will talk about the server part.
Server Part:
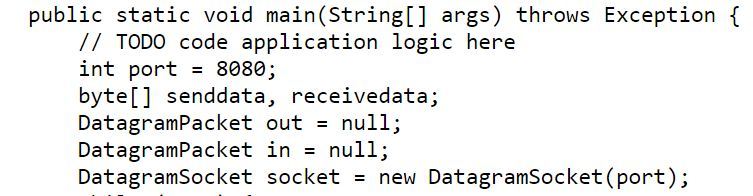
Same as client code before, we declared DatagramSocket, Server needs the address and the port number of the client that is trying to connect with it. So we will get the address and port from the client's file using getAddress() and getPort() method.


Now, server will send the file names from the directory. String dirname contains the path of the directory. Then we created a File named f1 to get the files from dirname and then created an array direct[] to contain the list of all the files from f1. Then with some coding we got our file names and send it to the client as packet.

Here is the code for UDPServer. Thank you for reading patiently.
Now, let's see how to transfer any size of file here.


