Showing posts with label java. Show all posts

Wednesday, January 24, 2018

A client server multichat program for network programming

This was like my 4th year's network programming lab's project. The main task is to create a server that will help some clients to make communication with each other, like any social media services like Facebook, Whatsapp, Messenger etc.

Software Used: XAMPP server, NetBeans IDE.

Codes, sql files are given in the folder. Create a database in XAMPP named multichat. Then import the sql file. These are the instructions for the program: 
  • 1. Type 'create User_name Password' to create an account 
  • 2. Type 'login User_name Password' to login your account
  • 3. Type 'logout' to logout from your account 
  • 4. Type 'joinchatroom Chat_room_name' to join a chatroom 
  • 5. Type 'leavechatroom' to leave from your current chatroom
  • 6. Type 'showchatroom' to show all available chat rooms 
  • 7. Type 'showuser' to show all logged in user available
  • 8. Type 'showfriend' to show your friend list 
  • 9. Type 'showrequest' to show your pending friend request 
  • 10. Type 'connect Friend_name' to send friend request to your friend
  • 11. Type 'yes Friend_name' to accept a friend request 
  • 12. Type 'no Friend_name' to reject a friend request 
  • 13. Type 'message Friend_name Message' to send private message to your friend 
  • 14. Type anything else besides these commands to chat with your friends :)
At first, run the Xampp and start apache and sql connection, then run the server.java in the server project and after that we can run client.java as many ( I set at most 50 user ) times to create new client that can communicate.

Snapshots of the project

Firstly we will create a user using ‘create’ command like this:

Be careful about spacing. Ok, now login part:


The username is incorrect. Same thing goes for incorrect password too.

Now we are logged in. All the other commands are similar like this. Commands: 
  • 1. create: creates an user account in the database. 
  • 2. login: login command requires three space separated strings. If not found three strings, then it will show invalid command in the console. If the user is already logged in, then it will also show already logged in. Else command will check username and password from client table in the database and the user will be online. 
  • 3. logout: logout will sign out the user from the program.
  • 4. joinchatroom: The user will be able to join a chat room using this command as follows:
**If there are already people in a chat room, and they are online; if then a person joins that chat room, every other members of that room (currently logged in) will receive a message to welcome the new user 
  • 5. leavechatroom: User can leave his chat room. User can enter another chat room using joinchatroom command. If he is already in a chat room, then he will automatically be removed from previous room. Basically, a user can be inside one chat room at a time.
  • 6. showchatroom: This will show how many chat rooms are currently available which has at least one member. If there is no member in a chat room, that room will be deleted.

  • 7. showuser: Show all currently logged in user.
  • 8. showfriend: It will show the user’s friend list.
  • 9. showrequest: This will show pending friend request. 
  • 10. connect: Send a friend request to a user. If user doesn’t exist in the database, then it will show incorrect user.

** Also case like: sending friend request to own self, sending request to user that already been sent etc are also handled, Try typing command like these to check.
 
Ok, now if Sifat logs in, then he will automatically see pending requests from different users.
  • 11. yes & no: If Sifat type yes aladin, then he and aladin will become friend. If types no aladin, then aladin’s request will be rejected and aladin will be notified via a message. If aladin is not online, then the message will be pending, else aladin will receive rejection instantly.
  • 12. message: Type message aladin to send aladin a private message.

As aladin doesn’t have friend named Sifat, so private message won’t be possible. So let’s make friends:

Now, both of them can share private message. Suppose, aladin sent a message to Sifat. If Sifat is online, he will receive the message. If Sifat is offline, the message will be stored as pending message. When Sifat will log in, he will then receive all the pending messages from different users.

**If user is not in any chat room, all of his messages will be global, an everyone who are logged in globally will receive that message(Broadcast). Private message between friends is Unicast and inside chat room, messages will be counted as multicast (only user in the chat room will receive messages).

You can find my project here: https://github.com/sifatshishir/Client-Server-Multichat

Friday, January 19, 2018

Java MySQL DELETE (using Statement)

See also: MySQL XAMPP Connection for Java jdbc Program

Suppose we have folowing table:


Now we want to delete one record at a time by following:
  • Create a Java Connection to our MySQL database.
  • Create a SQL DELETE statement.
  • Then execute a Java Statement, using our SQL DELETE statement.
  • Close our Java MySQL database connection.
  • Finally catch any SQL exceptions using try-catch clause.


See also:
Reference

Java MySQL INSERT (using Statement)

See also: MySQL XAMPP Connection for Java jdbc Program

First suppose we have a table in out database named user. Or we can create a simple table like below:


Now we want to insert one record in this table. By following some steps we will do that.
  • Create a Java Connection to our MySQL database.
  • Create a SQL INSERT statement.
  • Then execute a Java Statement, using our SQL INSERT statement.
  • Close our Java MySQL database connection.
  • Finally catch any SQL exceptions using try-catch clause.


quey1 is passing direct values to the table. query2 is passing values through variables. Be careful about quote marks for executing queries.

See also:
Reference

Java MySQL SELECT (using Statement)

See also: MySQL XAMPP Connection for Java jdbc Program

Let's see the following table:


Now follow these steps:

  • Create a Java Connection to our MySQL database.
  • Define SQL SELECT statement.
  • Then execute the SELECT query, getting a Java ResultSet from that query
  • Now iterate over the ResultSet, getting the database fields (columns) from each row of data that is returned
  • Close our Java MySQL database connection.
  • Finally catch any SQL exceptions using try-catch clause.


See also:
Reference

MySQL XAMPP Connection for Java jdbc Program

First we will open our XAMPP server.


Then type localhost/phpmyadmin/ in the browser. After that we will create our database. After that, see below java code for setting up connection for the database.

Java Database Connectivity (JDBC) is an application programming interface (API) for the programming language Java, which defines how a client may access a database. It is Java based data access technology and used for Java database connectivity. It is part of the Java Standard Edition platform, from Oracle Corporation.


"jdbc:mysql://localhost:3306/newdatabase" ; here 3306 is the port number for XAMPP server and newdatabase is the name of our database.

Remember : First create the database, otherwise it won't connect simply by coding
These parts seem ok, but you will get error if you didn't add the appropriate library(ies) to the project using Netbeans's library facility. So, let's see how we can do that :
  • First Right-click on the project's root node in the Projects tab.
  • In the pop-up context menu, click on Properties (on the bottom of the menu).
  • Click on Libraries under Categories:. You should see the following screen:


  • Click on the Add Library...
  • Under Global Libraries click on MySQL JDBC Driver and then click the Add Library button. (If you don't have library named MySQL JDBC Driver, then simply download it from internet)
  • Finally Click on OK.
If you need a specific version of the driver, you can download it, and then after clicking on Add Library... you can click on Create... to add the downloaded version to your library repository. You'd then remove the default JDBC Driver from the project, and add the library containing the specific version.
Following these steps properly will be enough for you to access your database.
See also:
 Reference

Java UDP (Transfer Any Types & Size of File)

In my previous post, I wrote about how to transfer files from one location to another using UDP connection for client server model. There was a limitation of how much size of data can be passed. Now I will discuss about how to pass any types and size of data using UDP connection.

As the file is larger, we can't send the file simply by using DatagramPacket with the help of our byte array. So what we need to do is that we will first divide the full file into some chunks or small size of byte array, say 1024 bytes each. Then we will count how many byte array is required to transfer the file fully. Then we will use a loop to send all the chunks serially.


We created a DatagramSocket ds, DatagramPacket out, byte array snd of size 1024. We created a File f1 and gave the location of the file to be transfered. Now for getting how many packets are required to transfer the file fully, we divided the file by the length of our byte array. So no_of_pkt will hold how many packets are needed to be sent. We then simply send the value to the server to let the server know that, the next file it will receive, will have no_of_pkt number of packets that are to be transfered.


We created a FileInputStream ff to transfer the packets at a time to the server. Inside the loop, we just created byte array of size 1024 each time of sending a new packet. The server will gradually receive these packets one at a time.

Thread.sleep(10L): Pausing Execution with SleepThread.sleep causes the current thread to suspend execution for a specified period. This is an efficient means of making processor time available to the other threads of an application or other applications that might be running on a computer system. We need this as we have many packets to be send, we will consider each of the sending process as a new different thread.
The server will also receive packets with the same loop stated above and gradually write them in a new file.

Sometimes server can't write all the packets. Packets may loss at the time of transfering process. Client will send all the packets but because server can't get all the data ( approximately 10-20% loss ) we need to wrap our whole program in a try-catch for exception. As each time we are sending and receiving new FileStream, we need to check whether they contain data from the previous packet or not. If they have data from the previous packet, then these types of data loss occurs. We need to handle it accordingly. Simply nullifying the Stream before each packet ( both sending and receiving ) will help.

Java File Transfer Using UDP Connection

What is UDP ?

User Datagram Protocol (UDP) is part of the Internet Protocol suite used by programs running on different computers on a network. UDP is used to send short messages called datagrams but overall, it is an unreliable, connectionless protocol. Basically a client will throw something to the server. And then, the server may or may not take the file, do something to that file and then may or may not send the file to some client. Unlike TCP connection, UDP doesn't need to establish connection between server and client before handling any kind of transfer.

What we will do :
  1. Create two new project: one for Server, another for Client
  2. Server will show client specific file items in a specific directory
  3. Client will then request the server to download a file from that directory by inserting the file name
  4. Server will then find the file in the directory, make a copy of it in another desirable directory
  5. Close socket
Client Part:


First, we create a public class named UDPClient under UDPClient project. The port number is where (Server) we will send our data. Scanner will be used to take user input for the filename.
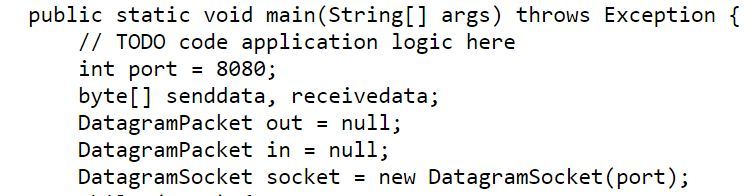
A DatagramSocket is the sending or receiving point for a packet delivery service. Each packet sent or received on a DatagramSocket is individually addressed and routed. Multiple packets sent from one machine to another may be routed differently, and may arrive in any order. We created a DatagramSocket named ds.

DatagramPacket is used to implement a connectionless packet delivery service. We created two DatagramPacket named outdata (for sending packet to server), indata(for receiving packet from server).

byte array is required to get the data from the packet as bytes. So we also created them.
Java InetAddress class represents an IP address. The java.net.InetAddress class provides methods to get the IP of any host name. We will get localhost for this purpose.


Now we know that server doesn't know anything about client unlike TCPconnection where firstly connection in established between server and client. So to get our server know about the client, we will send something to server from our client program. I sent address and port number ( it's not necessary, but i did it anyways :P ).
outdata is the DatagramPacket and it takes 4 parameters as input. Serially they are:

#Byte array where the data is stored
#Length of the byte array
#Address of the client
#Port number of the client


Now server knows client's port and address. So from the server (we will discuss it later), some specific file names from specific directory is sent to the client as packet and client will now receive that packet in indata, the DatagramPacket we declared earlier. For receiving a packet only byte array name and length is required, in which we will store our packet. Then converting into string, we simply print out the file names in the screen for the client to choose which file should be downloaded.


String fname will contain the user input file name and we will send it to the server via packet like we did at the first time.


Now after the server get the file name for download, server will send that as a packet and client will receive the file and write it in client's desired path.
public class BufferedWriter extends Writer. Writes text to a character-output stream, buffering characters so as to provide for the efficient writing of single characters, arrays, and strings. We used BufferedWriter to write out the file.
In java, FileOutputStream is a bytes stream class that's used to handle raw binary data. To write the data to file, you have to convert the data into bytes and save it to file.
An OutputStreamWriter is a bridge from character streams to byte streams: Characters written to it are encoded into bytes using a specified charset . ... Each invocation of a write() method causes the encoding converter to be invoked on the given character(s).
Finally we will close the socket.
See the sample code below for UDPClient. Next we will  talk about the server part.

Server Part:


Same as client code before, we declared DatagramSocket, Server needs the address and the port number of the client that is trying to connect with it. So we will get the address and port from the client's file using getAddress() and getPort() method.


Now we have just received the packet here and printed the result. With this server got the address and port number of the client ( So, later server can send packet to the address of the client willingly ).


Now, server will send the file names from the directory. String dirname contains the path of the directory. Then we created a File named f1 to get the files from dirname and then created an array direct[] to contain the list of all the files from f1. Then with some coding we got our file names and send it to the client as packet.


Now, server will get the file name for downloading from the client. String fname holds the file name to be downloaded. Then we check whether the file exists in the direct[] or not. If we find matching, then we preserve the index of the file. Then, File copy = new File(direct[idx].getAbsolutePath()); it will contain the path of the desired file. Then with the help of BufferedReader, we will write the file in String s, and then convert it to bytes for packeting, then we will send it to the client. Finally client will then rewrite the file in it's desired directory which we have already seen above.
Here is the code for UDPServer. Thank you for reading patiently.

Now, let's see how to transfer any size of file here.